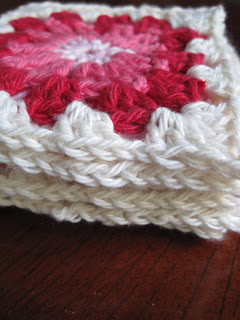
I've been enjoying crocheting my pink-red-cream cushion
and enjoying the way the circles turn into squares.
This rug was my inspiration.
Once I completed my nine squares
it was time to block them.
As you can see from the photo above, they were more
As you can see from the photo above, they were more
circular than square in some parts,
tending to bulge on the sides.
I thought I'd give a tutorial on
Blocking Your Crochet
using the spraying method.
Materials needed:
*Crochet piece/s to be blocked
*stainless steel pins
(to prevent any rust spots appearing on your work)
*flat piece of polystyrene foam
(ours was part of the packaging for our new fridge
if you don't have polystyrene you could use a cork square
or a towel spread tight on a carpet or bed)
*ruler or tape measure
(to rule up straight lines and measure sizes)
* Spray bottle of water
(or you can use spray starch, depending on your item)
Start pinning your work in one corner,
along a straight edge, if possible.
Pin the two adjacent corners and lastly the diagonally opposite corner.
This is where you might want a ruler to measure your sides
to keep it square.
If you are blocking multiple pieces then keep pinning them as above,
taking care to make each block the same size as the first one.
My piece of foam was conveniently just the right length
for all my blocks :-)
I didn't bother with the ruler this time,
as it was easy to match the line of the foam board.
I love the first look of the squares like this
Neat and straight
all my wiggles stretched out!
Next, spray your pinned work lightly with water (or starch)
and leave to dry.
Here are the squares after they had dried and been unpinned:
Lovely and square, with nice sharp corners.
They are flatter than before, also.
When I came to join my squares
I needed to crochet around the edge of each of them
before joining.
In hindsight I should have remembered to do that before blocking.
Once I'd done the extra crochet and then some
not-so-neat stitching them together
it was all looking pretty wonky again.
I didn't take a photo of that, it was late at night
and I wanted to get on with blocking it again.
I blocked the large square using exactly the same method,
only this time I used a larger piece of foam
and added some pins in the middle of the work
to keep all the lines straight.
If you look closely you can see a few pins on inside corners.
Now I'm just waiting for it to dry
before I add some more granny rows around the edges.
After that I will block it again,
and photograph the finished cushion.
Depending on your work
and the size of foam you have available
you may want to block in stages, as I did,
or at the end when you have finished.
Here is a photo of my granny square rug being blocked:
This was before I had foam from the fridge,
I had to use an old (but clean) piece of carpet
which was curled up a little and only just big enough.
I had to block them all in a hurry because our renovations
were about to begin,
and it was hard to keep the pins in place,
hence the not-so-straight edges.
But they turned out fine, the finished
rug is lovely and square.
One day when our living room is not part of a building site,
I'll post a photo!
So you can see that blocking is very easy,
but it will make a huge difference to your
finished crocheted item!


2 comments:
Oh wow! These are delightful! Perhaps I do need to learn to crotchet after all! :) Visiting after seeing your comments at Ivy Nest! :)
Thanks! I can't believe I didnt get into crochet for so long! It's really not so hard as I thought LOL
Post a Comment